Electronic and RF-Toolbox – Software user guide
1.General
This Manual describes how to use Electronic Toolbox and RF-Toolbox. Most examples and Screenshots are taken from Electronic Toolbox but will work the same in RF-Toolbox.
Please note: Besides this Manual, with it’s general descriptions, there are additional descriptions of each individual Tool inside the App which can be opened using the (i) Icon in the top right corner from inside the Tools.
The content is divided into the following main chapters:
- Tools – How to use the individual tools on the main tools page
- Projects – How to create and work with Projects
- Circuit Editor – How to use the built-in Circuit Editor
- Settings – Explains various App settings
- FAQ – Frequently asked Questions and solutions to common issues
In case of general questions or issues with the App, please have a look to the FAQ section first.
The Manual can be opened from inside the App or directly using the following link: http://go-to.me/etb-manual. (A German version is also available from here: http://go-to.me/etb-manual-de.)
You can open this link from your PC or Mac so you can see the Manual side by side with the App.
If you prefer a printed version, just tap on the PDF Icon on the website version to download a PDF file.
2.Tools
The Apps Electronic Toolbox and RF-Toolbox are offering many Tools which can be opened by tapping one of the Icons on the main screen of the Apps.
There are different types of Tools:
- Calculation Toolswhere Circuits or Components can be calculated (e.g. the Resistor or NE555 tool)
- Database Tools for Components (e.g. the Transistor or Pic Tool)
- Lookup Toolswith Tables and references (e.g. the Raspberry Pi Tool)
- Other Tools such as the Calculator, Scope or Audio Generator
All tools can be used in a similar way which is mostly self-explanatory but there are also sophisticated features such the E-Series adjustments for Resistance or Capacitance value entering or Parameter filter option for the database tools which are explained further below.
PLEASE NOTE: Before using the tools, double check your regional Settings on the Settings Screen under International. Here, you can select whether to use U or V for Voltage, the decimal separator or whether to use the metric system.
Customization
The Tools screen can be customized. Instead of Icons, a List can be displayed instead – with additional Information for each Tool.
Tools can also be grouped by the following categories:
- General Tools
- Tools for passive components
- Tools for active components
- Value conversion Tools
- Circuit related Tools
- RF related Tools
To switch between List or Icon mode or grouping and non-grouping, hit the top action button […] and select the desired option.
Besides these settings, you can also use the Organizer to arrange the order of the Tools, hide Tools or group them in Folders individually. The Organizer can be found on the Settings screen.
2.1.Finding a Tool
You can either scroll through the Icons to find the desired Tool. Or you can search for a Tool Name or even a Type.
For searching, tap the Spy-Glass, enter a search term and tap on Search on the keyboard. Next, all tools related to the search term will be displayed and can be selected.
In this example, we are searching for BJT. The results will show the Glossary Term for BJT and the two Transistor Tools.
You can also enter Types as search terms because the search feature also searches all Databases of all Tools. In this example, we entered the popular Transistor type BC107 as search term. This way, you can quickly jump to the Transistors Tool for this type.
(Please tap on Play > to start the Video)
2.2.The Database Tools
Database Tools are offering information like Specification, pinout, datasheet or alternative replacement type of a certain type of Component.
In Database Tools such as the Transistor Tool in the example below, you can find around 50.000 Transistors.
To find a particular type, you can either browse through the groups on the left side and the list, the most common use for this type of tool will be searching for a certain type.
For this, like on the main screen, you can tap the hour glass and enter a search term. After tapping on Search at the keyboard, you will see a list of matching entries.
(Please tap on Play > to start the Video)
In addition, you can also create a filter to narrow down the list content to types with certain parameters you are only interested in. For this, tap on the top Filter Icon and enter your filter criteria as follows:
(Please tap on Play > to start the Video)
2.3.Calculation Tools
Calculation Tools are for calculating electrical Components (Resistors, coils etc.) or even complete Circuits (Parallel-/series connections or even more complex circuits like NE555 Timer circuits).
In the example below, using the NTC PTC Tool, you can see how to use the Calculation Tools of the App.
Often, you need to select a type first. Like here, the type of NTC or PTC which should be calculated. Tapping on the Type will offer a list of possible selections.
You can enter values with the special Keyboard which allows you to tap on an x to clear the entry field or quick unit prefix selection k for Kilo, M for Mega etc.
The unit prefix can also be changed by hitting the button right of the Value. This is not only possible for input values but also for results (calculated) values. In the example below, we change the calculated Celsius value to Farenheit.
In most Tools, you can also define the direction of the calculation or in other words you can select which are the given values you have and which values should be calculated.
For this, you can use the yellow arrow button on the left side of a field. Hitting this button will change that field to a result field so this value will be calculated. Or you just tap on a result value to let this field be an entry field.
(Please tap on Play > to start the Video)
Preferred Numbers / E-Series
For capacitance and resistance values,certain fixed values have been standardized. For insance, a value of 5 is not available in the commonly osed E12 or E24 E-Series. Instead a value of 4.7 or 5.6 (E12) or 4.7 or 5.1 are available.
Tapping on the E-Series button left to the entry field will show a list of E-Series values (based on the E-Series selection at the top) and the difference of the entered value in percent will be displayed.
From here, you can also tap on a E-Series value to take over the value to the entry field. Now, you can reverse the calculation to see the deviation to your desired values.
More information about Preferred Numbers or E-Series can be found here.

3.Make
PLEASE NOTE: Make is only available on the iOS Platform

This Make section of the App offers various Tools to create, design, maintain and build your projects.
From here, the following Tools are available:
My Projects
This is, where you can store Circuit Diagrams, Component Lists, Documents like Datasheets, Notes and Links.
Online Projects
From here, you can download Projects from the Projects Website to My Projects.
Cross Reference
This Tool uses a Database of more than 55.000 Semiconductors. If you are working on a Circuit and need a certain Transistor or Diode but don’t have it in Stock, you can use this Tool to look for an alternative.
RS Components
This Tool offers a Browser to the catalog of the world’s largest distributor of electronics products. You can use this Tool to search for individual components or other products and can lookup their specification or datasheets and even place an order. This RS Product browser is also integrated in the My Projects and Order List Tool.
Octopart
In addition to the RS Product Browser, you can also search for Components and their specifications or datasheets using the Octopart Browser. This Browser however can not be used for purchasing.
Order List
Once, your Circuit design has been finished, you may need to purchase some missing components. This Order List Tool allows to maintain multiple Order List that can either be exported, printed or even be sent to your RS Components ordering basket.
Links
This list contains links to Electronics and engineering communities and websites. Please use “Suggest Links” to let me know which Websites you like me to add.
Bookmarks
From the RS Components and Octopart Browser you can bookmark components for later reference. All bookmarked components will appear on the list inside this Tool.
Library
The App uses a Document Viewer which will be used to display images or PDF documents wherever an image or document needs to be displayed. This could be, for instance, a pinout from the Transistors Tool, a datasheet from the PIC Tool or a Document of the Product Data Library of the RS Components Browser. If you tap on the […] Icon at the top of the Document Viewer, just select “+ Add to Library”. After confirming or editing the name, the particular file will be copied to the Library. Such Documents don’t have to be downloaded again and will be available even offline.
Circuit Editor
The Circuit Editor allows you to draw Circuit diagrams. Circuits can be saved to iCloud Drive and added to My Projects.
4.My Projects (iOS only)
PLEASE NOTE: Projects are only available on the iOS Platform.
Projects can be used as a general store for all kind of information that can either be collected throughout the Tools or even added from external resources.
Projects can be used to temporary store calculation results, components, images or even to maintain a full development of a complex circuit.
Projects can also be used to store and collect information for a complex circuit development.
Each Project can store one or more of the following parts:
- Components (such as Resistors, Diodes, ICs etc.)
- Images and Documents (such as HTML,PDF or Text documents)
- Circuit Diagrams (using the Circuit Editor)
- Website Links (links to websites)
- Detail Notes (such as manually typed or pasted text notes)
You can print and even im- and export projects via E-Mail.
How to use
After opening the “My Projects” Tool, all available projects will be displayed on this screen.
In order to create a new project, just tap the Plus (+) Icon on the right side of the navigation-bar. Alternatively, you can open an existing project and use the action button […] to duplicate that project.
Projects can be deleted by tapping on the project first, which displays the project details and then by tapping on the wastebasket.
4.1.Editing a Project
After opening an existing or creating a new Project, the Project Detail screen will be displayed where you can see, add and edit all the assets and properties of the project such as Components, Diagrams, Images and Diagrams, Circuit Diagrams, Website Links and Detail Notes.
Under the Notes section, you can enter and edit your main Project Notes. This editor also allows you to use formatting like Bold, Italics etc.
To add new element to a Project, there are two possibilities:
1. Select the type of element you want to Add under the Content section.
For all, except for the Detail Note you will get a list of Elements and can use the (+) Icon at the top to add a new element as usual.
or
2. Switch to a certain Tool (e.g. the Resistors tool), perform your desired calculation and hit the action button […] in the upper right corner. From here, the Component can be added to a Project.
The below Animation shows an example how to create a new Project:
In the above example, you can see these steps:
- Creating a new Project
- Create a Circuit with just one Resistor
- Using “Synchronize Components” to get the Resistor added automatically to the Component List
- Looking up the Color Codes for this Resistor in the Resistors Tool
- Browsing for the MPN and Manufacturer
- Editing the Project Note
This way, you can add an unlimited number of components or any other Content (Diagram, Documents etc.).
iCloud Drive
PLEASE NOTE: I strongly recommend to use iCloud Drive to store your projects. This will not just always keep a Backup of your projects but also allows you top open and work on your Projects on any of your devices.
In order to use iCloud Drive, the following three settings must be turned on:
1.) Under iOS Settings (not the App), iCloud must be switched on. You may need to enter your Apple ID after switching iCloud on.
2.) Below this setting, there is another setting for iCloud Drive which also needs to be switched on.
3.) Finally, inside the App, go to Settings -> Miscellaneous and turn on “Use iCloud Drive”.
If you have concerns using iCloud for other purposes, you can simply switch off all other Services except iCloud Drive such as Photos, Notes etc. in the iOS iCloud Settings.
Once iCloud Drive has been activated, there is no difference when working with Projects except that Projects are stored on iCloud drive in addition whenever there is an internet Connection available. If you would then start the App on another device, you will see the same Project list and can open the Projects on that device as well.
4.2.Project Components
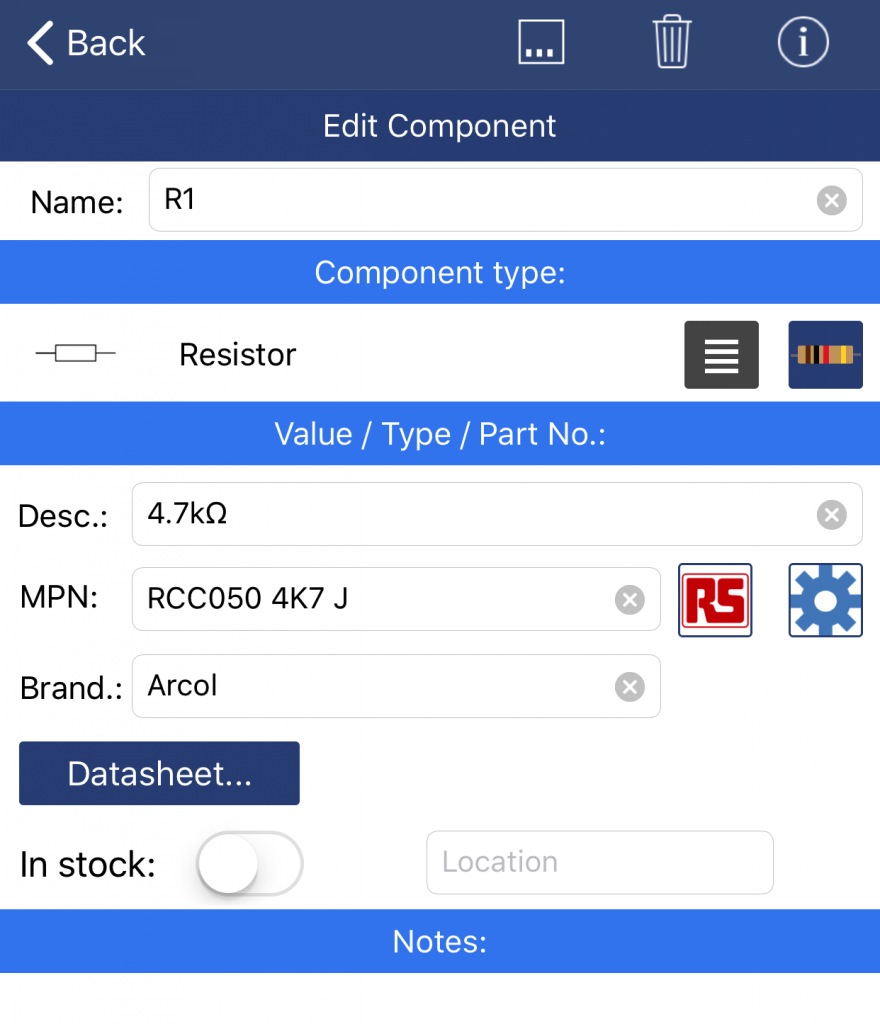 The Project Components screen lets you enter a Name for the Component which could be the Name of the component on the PCB (such as R1, IC2 etc.).
Below, you can select the Component type by hitting the ☰ button. Select Other if no predefined type fits.
After a type has been selected and in case there is an corresponding Tool available in the App, the Tool Icon will be displayed next to the ☰ button which can be used to jump to the Tool for instance to lookup color codes or perform some calculations.
Next, you can enter The Type or Value of the Component. For Resistors, you can enter the Resistance value, for ICs you can enter the IC Type for example.
The MPN field is dedicated for the Manufacturer Part Number. This value can, but most not be identical with the Type. For ICs there are often different MPNs for different packages.
Hit the RS Components or Octopart button to Browse for the corresponding Component. After selecting the correct component in the Browser, the MPN and Brand fields will be filled with the selection.
If both, MPN and Brand have been filled out, you can hit the Datasheet button to open the datasheet for the component, if available.
If you want to store that Datasheet to your project, just hit the […] button and select “Add PDF Document to Project”.
4.3.Project Images and Documents
The Images (JPG od GIF Files) or Documents (PDF or HTML files) can be added or maintained in a similar way like components.
Here, only the Title needs to be entered and the file needs to be selected using the (+) button in the upper right corner.
Next you can choose if you like to add a File from your Photo Library.
Images or Documents can also be added from document viewer which is used throughout the whole App to display images and other Documents like PDF Files. Just tap on the […] inside the Document viewer and tap on “Add to Project” to add a certain Image or Document to a Project.
4.4.Project Notes
You can edit two type of Notes. First, there is the main Project Note text on the Details screen of the Project. Then, there are Detail Notes which can be opened for editing by tapping on “Detail Notes” on the Project main screen.
For each Note, you can edit, copy/paste an unlimited amount of Text. It is also possible to use formatting such as Bold or Italics. For this, just select the part of the Text you like to format. Next, you will see the bar which includes offers the Cut, Copy, Replace commands as well as B/I for Bold and Italic formatting.
4.5.Website Links
This screen allows you to add links to websites to your Project.
Similar to Components, just tap on (+) to add a new Link, enter a Title and the URL of the link and tap on OK.
All website link will be displayed in the list. When tapping an entry, the website for the link will be displayed.
To alter a link, just tap on the (i) Icon of the line you like to edit and change the name or link.
To delete a link, just swipe the line to the left as usual.
4.6.Project Circuit Diagram
On a limited basis, you can create your own Circuit Diagrams from inside this App.
PLEASE NOTE: This feature is currently under Beta, some features might have bugs or may not fully work.
To Create or Edit a Circuit Diagram, enter a Title and tap on Edit at the top. The Circuit Editor will be opened which allows you to create or maintain a Project.
Synchronizing Components
All Components of such a manually created Circuit diagram can also be Synchronized with your Projects so they don’t have to be entered twice (In the Diagram and the Component list).
For this, just hit the top action button […] on the Project Screen (not the Circuit Screen) and select “Synchronize Components”. Synchronized Components will then be displayed in blue, whereas manually added Components remain colored in black.
5.Circuit Editor (iOS only)
PLEASE NOTE: The Circuit Editor is only available on the iOS Platform.
The Circuit Editor allows you to draw Circuit Diagrams on a limited basis, limited to currently around 75 different components from passive Resistors to Logic Gates and SRAM Chips.
(Again, please note that this Edtor is in a Beta state and may have bugs)
As already mentioned in previous chapters, the Circuit Editor can be started from within Projects after adding a Circuit Diagram, opening the Diagram and tapping on Edit.
The Editor uses a menu at the Bottom for File operations and Copy/Paste, Undo/Redo features.
All other drawing features will extensively use gestures as follows:
- One finger Double-Tap on the sheet – to zoom in (can be disabled)
- Two finger Double-Tab on the sheet – to zoom out
- Long Tap on the sheet – to add a new component
- Single Tap on a component – to select a component or component pin
- Double Tap on a component – to open the Component property screen
- Pan – to move the sheet (can be disabled)
PLEASE NOTE: If you are using an iPad Pro with a Stylus, you can use the action button […] and select “Use Stylus”. This will disable some finger gestures which will be replaced by Stylus operations.
PLEASE ALSO NOTE: In the same settings of the action button […] you can select “limited gestures”. When switched on, you can disable two gestures double-tap and pan. With this setting, you can only pan and zoom the circuit sheet by using two finger gestures. This makes it easier to edit circuits.
Adding a Component or Wire
When adding a new component using the Long-Tap gesture, you will get a Popup for selecting the desired Component from a grouped list. Once you select the Component (or Wire, outlet etc.) the Element will be placed right where you tapped on the Screen.
After adding a Component, you may want to double-Tap on the Component. This will open the Component property screen where you can enter a Name, Type and other Parameters. These properties will be used for the Project Component list Synchronization.
Moving Components
To move a Component to the desired Location, just tap once on the Component to select (Highlight) the Component. Now you can Tap-Hold and move the Component to any location.
Connecting Components
To either Connect Components to each other directly or using a Wire, just tap on the Pin of the Component you like to connect. A circle will be displayed to indicate the selected Pin.
Now, you can move the Pin by Tap-Hold and move the Pin to the desired connection. Some Components will require a Wire to get connected to another Component like the OpAmp. Some others, like the Resistor can be connected directly to another Component.
Currently, only straight Wires (Horizontal or Vertical) are supported. If you like to place a Wire in a 90 Degree Angle for example, you need to use two Wires.
If you Connect Wires or Pins and see a red circle, this indicates that the App is not certain if you like to connect these Wires to each other. To solve this, just move the other Wire temporary to another location and back again.
(Please tap on Play > to start the Video)
6.RS Components Browser
This Tool offers a Browser for the catalog of the world’s largest distributor of electronics products. You can use this Tool to search for individual components or other products and can lookup their specification or datasheets and even place an order. This RS Product browser is also integrated in the My Projects and Order List Tool.
You can browse for a certain component by either entering it’s Name, MPN, Type or drill down the Categories or Brands.
When entering a search Term, the App performs a full-text search for each entered word. For instance, you can enter 4.7k Resistor and will find all 4.7k Ohm Resistors, which includes Carbon, SMD and Thin Film resistors.
PLEASE NOTE: RS Components has different catalogs for different markets. In order to see the right catalog for your Country, please go to Settings and under International, select the right Market for your Country for “RS Catalog Country”. Some Countries, like the US, are not yet included. In this case, please select another country which is either close to your country or uses the same language at least.
After tapping on an entry in the result list, you will see the detail screen for the product.
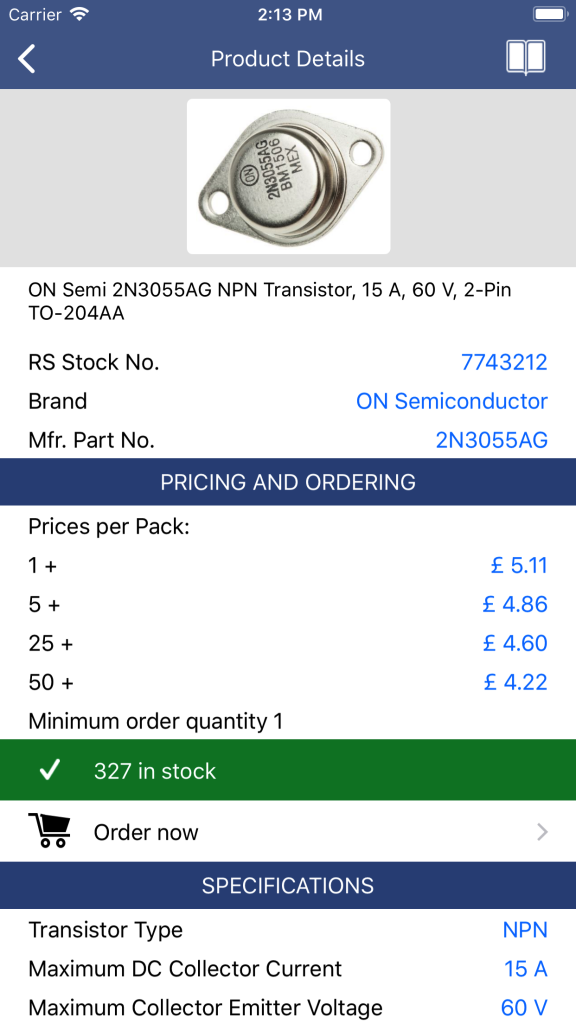
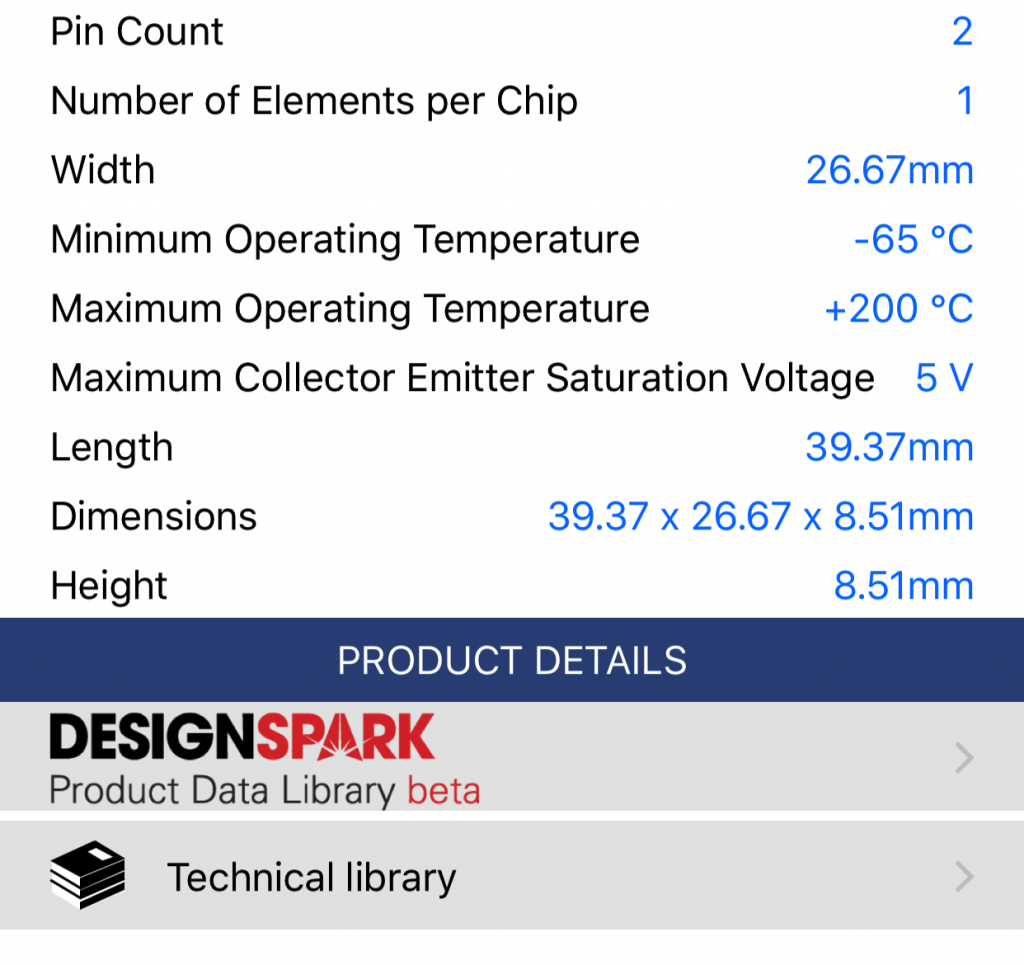
At the bottom, you will also get access to the DesignSpark Product Data Library and Technical Library which may offer additional documents and specification for this product.
Tap on Order Now to add the component to the RS Shopping Basket.
In order to products, you will need to register at RS Components. For this, you can find the Login or Registration Icon at the top of the screen.
To Bookmark a component, just tap on the Book Icon at the right hand corner.
7.Octopart Browser
This tool offers a Browser for the Octopart component Database. You can also use this tool to search for components and looking up specifications and datasheets.
To search for a component, just enter the search term such as the Type or MPN in the Search field and tap on Search.
To Bookmark a component, just tap on the Book Icon at the right hand corner on the detail screen for a component.
8.Bookmarks
From the RS Components and Octopart Browser you can bookmark components for later reference. All bookmarked components will appear on the list inside this Tool.
This list can be sorted by Type (Source of the Bookmark) or by Name.
If you tap on an entry in the list, the corresponding Browser page for the component will be displayed.
To alter the Title in the List, just tap on the (i) Icon right of the entry. From here, you can also delete the entry or add the component to a Project.
9.Library
This Library will store all kind of Images, Documents like PDF Files or Circuit Diagrams for offline access.
One possibility to Add files to the Library is to use the the Document Viewer which will be used to display images or PDF documents wherever the App needs to display an image or document. This could be, for instance, a pinout from the Transistors Tool, a datasheet from the PIC Tool or a document of the Product Data Library of the RS Components Browser. If you tap on the […] Icon at the top of the Document Viewer, just select “+ Add to Library”. After confirming or editing the name, the particular file will be copied to the Library.
The Circuit Editor also offers a “+ Add to Library” button from the File Menue of the Circuit Editor.
Such documents in the Library don’t have to be downloaded again and will be available even offline.
If you tap on an entry in the list, the corresponding Document will be displayed.
To alter the Title in the List, just tap on the (i) Icon right of the entry. From here, you can also delete the entry or add the document to a Project.
10.Order list
The Order List allows to create multiple list of components you like to order.
Creating a new Order List
You can either create a new Order List by tapping the (+) Icon at the top, enter a name for your new Order List and adding components you like to add to the Order List by tapping the (+) Icon again.
Alternatively, you can create a new Order List automatically from inside My Projects Tool. In this case, you need to open your Project under My Projects, open the component list and tap on […]. Here you will see the choices “+ Add Components to Order List” and “+ Create new Order List”. All Components of the project will then be added to the Order List. Of there are multiple Components of the same type, only the order quantity will be increased.
Maintaining the Order List
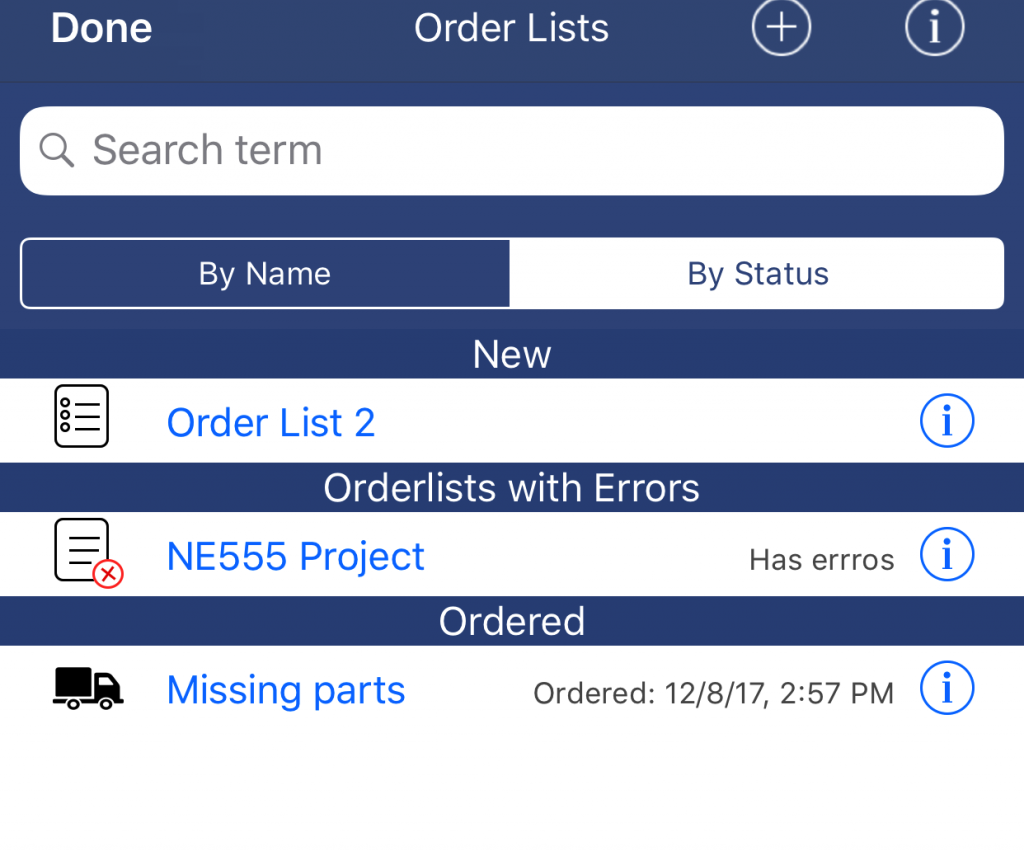
 Each List has a status as follows:
- New – if the list was just created
- Ordered – If you already placed the order
- Delivered – If the order has already been delivered
- Error – If the order can not be processed
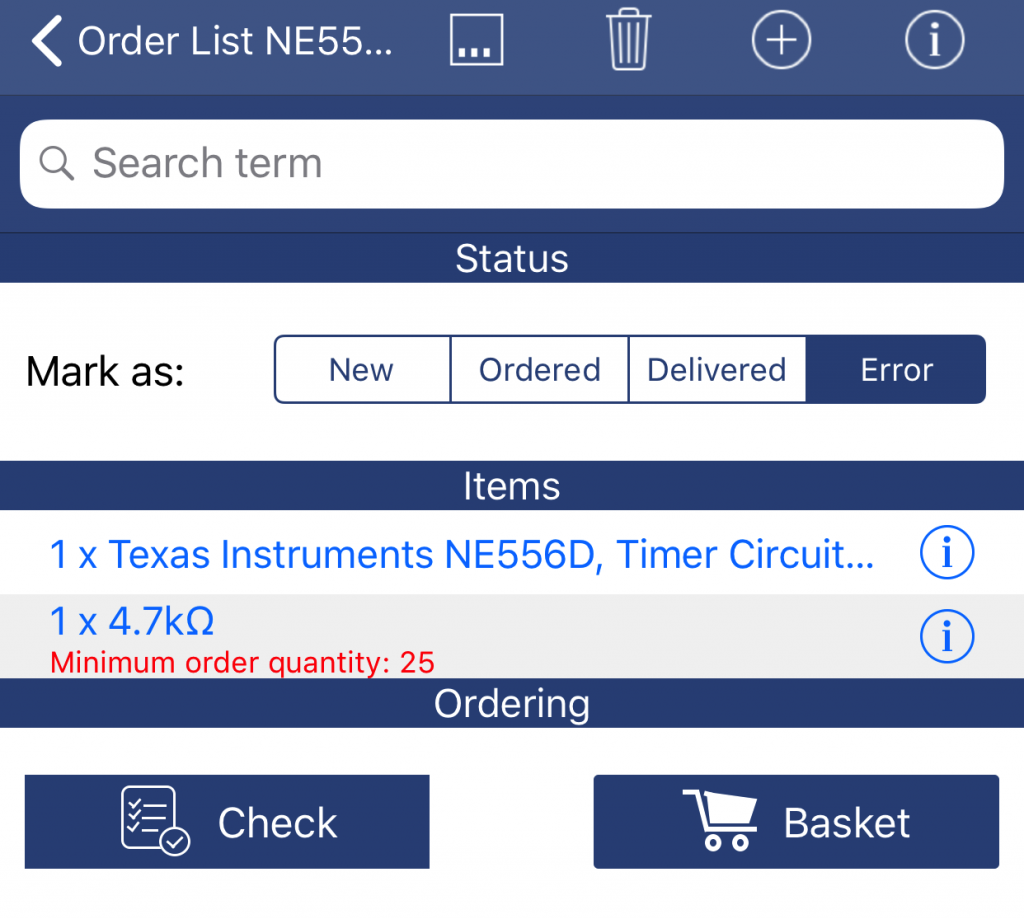
You can maintain the status manually at the top of the detail screen. Depending on this selection, the order will also have a different Icon on the Order List main page.
To add individual components to the Order List, tap on the (+) Icon, enter a description and tap on the RS Components Icon to lookup the component.
The entered description will be used as search term but can be altered if the right component can not be found.
Before you select one entry from the result list, you may want to check if that’s indeed the right component and if you are able to order the component by double checking the availability and minimum order quantity. For this, just tap the (i) Icon in the line to see the component details.
After tapping the line of the list the MPN, Brand and Stock Number fields will be filled out based on your selection.
If you are not ordering from RS Components, you can also enter these fields manually.
Finally, you need to enter an order quantity and can close this screen.
Placing the Order
Before placing the Order, you can use the Check button below the list. This button will verify your entries and show a warning if something is wrong or missing. This could be a wrong order quantity or missing information.
In case of errors, you will see the reason displayed in red in the order line. You can then tap on the line and correct this error.
In case of no Errors, you can proceed and tap on the Basket button.
Now, you need to login to your RS Components account by tapping the Icon at the top. If you don’t have an account yet, tap on Register.
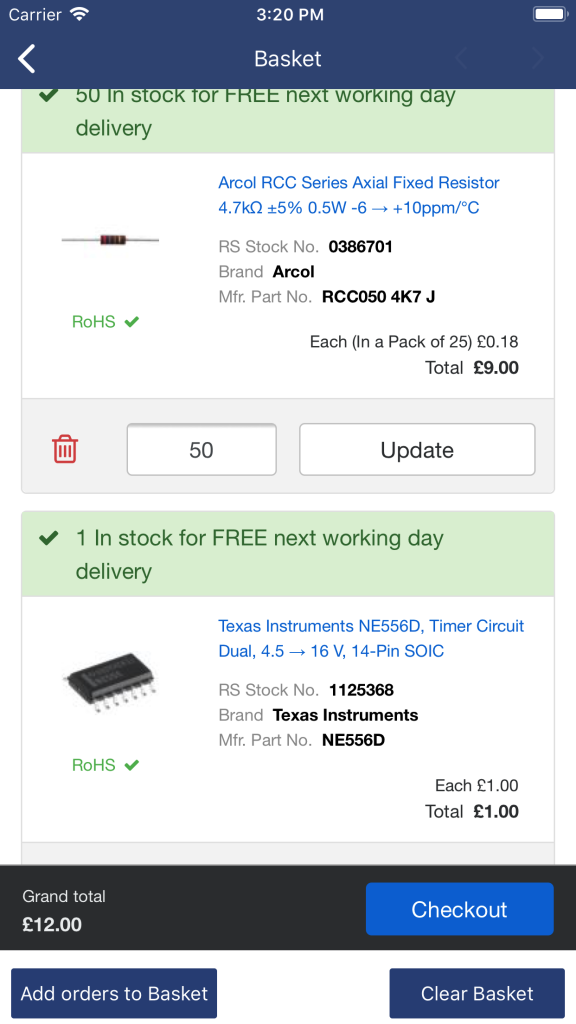
The Basket may show previous orders, you put in your basket and didn’t order yet. To empty your Basket, tap on the Clear Basket button at the bottom.
Tap on Add orders to Basket to transfer your Order to your shopping Basket.
Double check your order and if all is correct, tap on Checkout to finalize your order.
When returning to the previous screen, you may want to mark this order as Ordered and once the order has been delivered, you can mark the Order accordingly.
If you are not ordering from RS Components, you can also print or Export the Order by hitting the […] button at the top.
11.Settings
The Settings on the Settings screen allows to change various settings to change the behavior or design of the app.
You can also find various information such as Version information and Version History on this screen.
Please use the Support / Feature Request button in case of questions, suggestions or even if you may find a bug.
By using the action button […], you can save or restore your settings to iCloud or restore all settings to their default values.
Please note the Check for data update button at the end of this screen. I am creating Data updates from time to time to update the Databases or even add some feature improvements (e.g. new Components). Once such an update is available, you should get a notification when the App is started. If the “Check for update at start” button is switched off or if you never use your App on a WiFi network when started, you will not get such a notification. For this reason, I suggest to check for data updates manually from time to time. Data updates will also be announced in the News section of the App.
Most of the settings and options here are self-explanatory maybe except for the following:
Show info Text in Tool
When enabled, the information text which will be displayed by hitting the (i) Icon will be displayed at the end of each tool.
Use U for Voltage, not V
In some countries, the U sign will be used for Voltage whereas some others are using the V. By using this setting, you can select which option is applicable to for your country.
Adjust entry to E-Series value
When switched on, values entered will automatically adjusted to the closest E-Series (preferred) value. For instance 4.6 Ohms will be changes to 4.7 Ohms.
12.Organizer (iOS only)
PLEASE NOTE: The organizer is only available on the iOS Platform.
This App offers many individual calculation tools and databases. Depending on your personal requirements, some Tools might be more important for you than others.
The Organizer will help you to sort or arrange all tools according your needs.
Using the Organizer, tools can be…
- …moved to a desired location,
- …moved and collected in folders,
- …or even disabled.
How to use
Once started, the Organizer lists all tools similar to the List View in the tools screen.
In order to disable (hide) a certain tool, just tap on the small check-mark button on the left side of each line.
In order to move a certain tool (e.g. move it to the top of the list or to the bottom), use the standard icon (≡) on the right side of the list. Just tap on this icon, hold it and move it up or down and release it at the desired location.
In order to store tools in folders, first create a new folder using the action button […] and select “Create Folder”. After this, you will be asked for a folder name before the folder with a corresponding Icon will be created.
In order to rename or delete a Folder, just tap on the folders Icon and select the desired function “Rename” or “Delete”.
Tools can be moved to folders in two different ways.
1. By tapping on the tool Icon of the tool you like to move to a folder. You will then be asked for the folder, where you like to move the tool to.
2. It is also possible to drag and drop tool Icons to a folder.
Tools can be removed out of folders by first opening the folder by tapping on the folder and select “open”. Inside the folder, just tap on the tool Icon you like to move out of this folder and select “Move out of folder”. The tool will then be placed back at the top level.
If you like to reset all folders and all locations of the tools to the original location, just press the action button […] and select “Reset to defaults” button at the top.
Save and restore
You can save or restore the layout and folder names you have maintained in the Organizer to iCloud. Saving to iCloud has two advantages:
- your work is saved and can be restored even if you would reinstall the app.
- you can restore the layout to another device if you run this app on more than one device.
To save or restore your work, just hit the action button […] and select the corresponding function.
Please note: iCloud services must be enabled in the setting of your device in order to use this possibility.
13.News
In the News section you will find information about App updates or other App related information.
You can use the action button […] to mark all News entries read/unread or delete entries.
You can manually update the news list by either taping on the refresh button or by pulling the list down and release it.
By using the setting (Gear) Icon, you can select subjects for which you like to see news.
14.FAQ and common issues
Please find below some common issues or questions and their solutions and answers. If you have a question and can’t find the answer here, or even in case you find a bug, please let me know. I am highly interested in your feedback.
Ideally, use the Support / Feature Request button on the Settings screen for this.
Data update takes ages or even never finishes
By using data updates, I am able to update contents for the App without the necessity to create a new App version which will takes much more time for being released due to development, extra testing effort and the necessity to let all updates be reviewed by Apple.
I am sending out Data updates from time to time. Sometimes smaller, sometimes bigger. If you download such a data update, only the changes to your existing database in your App will be transferred.
If you have just purchased this App and if there were many data updates meanwhile between the release of that App version and the time of your purchase, there might be a big data update which is waiting for being downloaded.
For the first data update I always recommend to use a stable WiFi connection. Further updates are usually smaller so they can even be downloaded using 3G/LTE/UMTS.
If for some reason, the update doesn’t download, please contact me using the support button inside the App. This problem can be solved but it’s often something very specific and individual so just contact me and we will sort out that issue via Email.
The Scope and Frequency counter are not working
This is, because you dismissed the iOS question which asked you for permission to use the Microphone by the App.
To enable the Microphone again for the App:
- Open Settings
- Tap on Privacy
- Tap on Microphone
In the following list, you see all Apps with features that need to use the microphone. You’ll notice that the Apps have switches. You can toggle these to control access to the microphone for each App.
So, for Electronic- or RF-Toolbox, just change this switch to “On” and the Scope and Frequency counter will work again.
Some users reported that they had to re-start their device after switching the setting to get it back working.
What does PDIP, SOP, SOIC or TSSOP mean and what is the difference?
Sometimes I get similar questions but there is a quick and easy way to ask Electronic Toolbox for an answer.
You can use the Global Search function of the App. Just enter, for instance PDIP in the top search field and start to search for this term. You will then see that PDIP is a Package type and there are even four different variants with 14, 20, 28 and 40 pins. In the same way, you can search for the other Packages and can see what the differences are.
How can I find the closest Resistor of the E12 series or preferred value?
This is quite easy to do by using the “E-Series” buttons in front of the Resistance, Capacitance and Inductance fields.
Let’s take the LED Calculator as an example. First select that you want to calculate the resistance here (tap on the button in front of Resistors) and just enter your values for Vin (e.g. 3.3V), number of LEDs (e.g. 1), LED Voltage (e.g. 1.2V) and LED Current (e.g. 20mA). You will get a resistance of 105 Ohms which doesn’t fit in the E12 series.
Now select that you like to calculate the current (tap on the button in front of this field).
Then tap on the E Series button in front of the Resistance value. At the top, if not already selected, select the desired E-Series (E12). In the list, you can now see all values which are part of this series and their individual difference to the calculated 105 Ohm value. The closest is 100 Ohms (4.76 % difference) but since it’s a good idea for the LED circuit to lower the current, rather to increase it, we should select a higher Resistance which is 120 Ohms with a difference of 14.29 %. Once you select this entry, you will jump back to the calculation tool which re-calculates the circuit based on your selection.
Now you can see that the LED Current will only be as high as 17.5 mA which is still fine.
I have a general question about Electronics. Can you help?
At least I can try. I am a passionate Electronics hobbyist and HAM radio operator and developed several projects. I am still building circuits and projects and even use my App almost every day. Of course there are subject I never worked on or may even never heard about.
So if you have a general question, don’t hesitate to ask. Maybe I can give you a quick answer or point you to some resources on the web but maybe I can also add a new feature to my App that helps regarding your question in one of the future updates.
However, please keep in mind that I am receiving a lot of mails per day and I will prioritize questions regarding the App itself.
I sent you a question via E-Mail but didn’t get a response. That’s unpolite!
Yes, that’s true and unpolite. However, usually I am answering any question – maybe not the same day.
But it happens sometimes that I receive questions sent by the Form on my website and when responding back, I get an error either saying that the E-Mail is wrong or the In-box is full or treats my answer as spam.
The first issue can be prevented by using the Support button in my App. This even adds some extra information to the mail about the App and iOS version you are using so I don’t have to ask.
For the two last issues, there is not much I can do but if you expect an answer and don’t receive one, please check for the aforementioned issues and don’t hesitate to send me a reminder.